Tuesday, July 27, 2010

Kebabs

Seitan Kebabs

I have to admit, that I am a little chagrined about how much the seitan chunks look like meat in these photos...I'm not terribly interested in replicating meat experiences...but in the same breath, I'll also admit that these were darn good. I apologize if the meat-like appearance freaks anyone out. (It sort of weirded me out a little too.)

The faux meat is some of Gardein's Beefless Tips...of course any kind of seitan that suits your fancy would work a treat too. I usually opt for the homemade variety...but sometimes you just don't have time to stay on top of the homemade seitan scene and/or whip up seitan on the fly, ya know?

I got the idea from an omni cooking magazine that I was leafing through at my mom's house...the simplicity of the three ingredients together (seitan, red onion, red pepper) appealed to me somehow, so I went with it. The nice thing about this particular combo is that the ingredients all take about the same time to cook (provided they are chopped into similar-sized pieces).

The seitan is marinated in a simple, but delicious mixture. (For an oil-free alternative I think subbing a mixture of lime juice and Bragg's Aminos for the oil would be good--better even. You'd probably want to leave the salt out in that case.)

Garlic-Coriander Marinade:

1 tbsp olive oil
4 cloves garlic, finely minced
1.5 tbsp coarsely ground coriander seed
pinch of coarse sea salt
(Marinade and kebab recipe adapted from Bon Appétit, August 2010 issue)

Depending on how much seitan you plan to use, you might want to double or triple the recipe.

After tossing the seitan in the marinade and leaving it for an hour or two, just skewer it all up with the veggies, plop them on the BBQ and baste occasionally with the leftover marinade:


We had them with some salad from the garden, rosemary roasted potatoes, and a drizzle of vegan basil pesto.


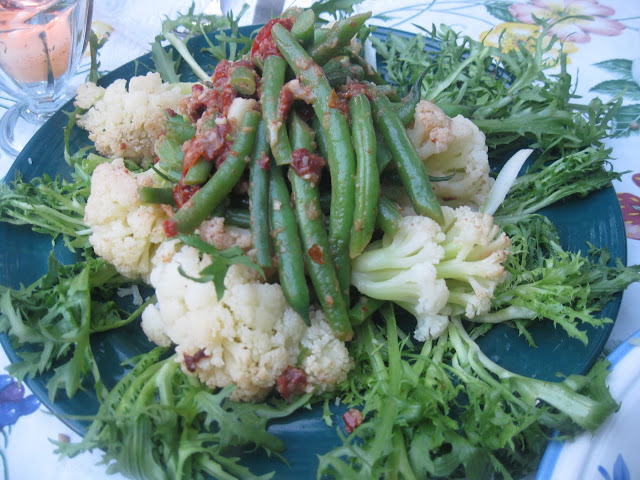
But wait, there's more...we have hearty appetites you know. We also dined on some cauliflower and green beans in a sun-dried tomato and shallot vinaigrette:


The beans and cauliflower are lightly blanched and then tossed with the dressing on a bed of frisée lettuce:

Sun-dried Tomato - Shallot Vinaigrette:

1/2 shallot, finely minced (~ 2 tbsp)
2 tablespoons sherry vinegar (or to taste)
1 generous teaspoon Dijon
3 tablespoons extra-virgin olive oil ( or more/less to taste)
4-5 sun dried tomatoes, finely chopped (I used dried, reconstituted in warm red wine...if you have any dry sherry on hand,  reconstituting them in that would compliment the sherry vinegar)

Whisk all ingredients together until well combined. (If you don't want to use oil, you could substitute with cashew cream.)

This is our dining room during the summer:


And now for a little backyard drama. The photo below shows 3 Western Red Cedars that live in the eastern corner of our backyard.


Our landlord planted these about 15 years ago, thinking that they were a different type of decorative cedar that only reaches a mature height of 12 -15 feet (4-5 meters). Boy, was he mistaken: these trees grow hundreds of feet high. According to my neighbor, these particular trees are just entering their teenage years and have a lot more growing to do. Notice how the tops have all grown intertwined, making it look like one big tree, (the one in the middle must really be feeling the love!) but if you look below the branch line, you see three distinct trunks.

Here's where the drama comes in: my neighbor is afraid that the roots of the trees will eventually  push up his foundation and cause structural damage...he's some sort of civil engineer, so I tend to think he knows what he's talking about. He wants my landlord to cut the trees down. My landlord on the other hand, isn't willing to pay for this...so my neighbor and my landlord are in the process of hashing it out; we're stuck in the middle.

I don't want the trees to go, because they are beautiful and just starting out in life. And the critters love them. Raccoons, crows, stellar jays, flickers, chickadees, and other creatures often come down from their limbs to pay us a visit. I guess we'll have to wait and see what the future holds for these young cedars.

Wednesday, July 21, 2010

Chilled Raspberry Soup w/ Thai Flavors (& Ravioli Follow up)


These past few weeks, we've literally been buying pounds of fresh berries at the farmers' market and munching on them as snacks, dessert, and everything in between. That's just thing with berries; you can toss those little jewels in anywhere (especially your mouth!).

This soup may not suit everyone's tastes...it's a bit on the tart side and you have to like the flavors of cilantro, lemon grass, and kaffir lime. (Of course, cilantro-averse people could sub basil or mint, or any herb that suits their fancy.)

Although I give approximate measurements of what I used below, I intend this as more of a recipe idea rather than an actual recipe.  I encourage anyone who tries this to add the ingredients in little by little adjusting to suit your own tastes and/or subbing with other flavors that sound good. The end result in this case came out in a strong raspberry flavor with subtle hints of lime and lemongrass.


And one last thing: I didn't sieve the raspberries...we don't mind the errant seed and a slightly thicker texture, but it's up to you...*if I were serving this to company, I would definitely sieve them first.* :)

Recipe Idea   (Makes 4 small appetizer servings or 2 average servings):

1 pound fresh raspberries, rinsed ( ~ 2 cups)
12 inches worth (~ 1/3 cup finely chopped) lemon grass,  tough outer leaves removed and cut into fine rounds
4-5 kaffir lime leaves, finely chopped (or more/less to taste)  ( I use dried ones)
1/2 cup finely chopped cilantro (or more/less to taste)
1 cup coconut milk (or more for a creamier, more coconut-y flavor)

Mix everything in a blender until smooth and allow to chill for at least 30 minutes. Serve chilled and garnish with cilantro and raspberries. As an afterthought, a bit of shredded coconut would be nice too.

PS: If you don't have a super blender...make sure you really trim off all the tough leaves from the lemon grass...get down to the really tender stuff... in order to avoid any stringiness.

And now for something completely different....

Here's a follow-up shot of the ravioli from this post...(in case anyone was wondering):


I served them with sauteed crook-neck squash and a fresh tomato sauce seasoned with garlic, red pepper flakes, and fresh oregano; garnished with basil and black olive.

Verdict: Thumbs Up.  The filling imparted a light lemony richness, while the summery flavors of fresh tomato and oregano gave a sweet-savory zing. The yellow squash was a nice textural component and added color.


Summer is fleeting by isn't it? I hope everyone is enjoying it.

Ciao for now.

Roseann LaPonte
Rosanne Tobin

Sunday, July 18, 2010

Ravioli Fun in Two Colors

Who doesn't love ravioli? I know they're one of my favorite things.  And sure, there are a few vegan ravioli options out there...but  if you have some extra time to spend in the kitchen, why not make some of your own? They're not that difficult to make (it's actually pretty fun) and, you have total control of what's in the filling...there's no end to the flavors and combos one can devise around those! They don't have to be picture perfect either, they just have to stay together while cooking and taste good.

This weekend, it so happened that I had some of that elusive stuff called spare time, so I decided to have some fun and make ravioli.  Inspired by a common pasta combo of green and yellow pasta called "paglia e fieno" or "straw and hay", I made two different doughs: a green dough  and a regular old plain pasta dough, which passes as yellow my book. (You could make it more yellow by adding some saffron, but I didn't bother with that.)


I think the green dough is traditionally made with spinach or nettles, but why not get a little crazy and try collards (or any other leafy green)?  It's not meant to impart any particular flavor--it is more for the color effect anyway.

For the dough, I usually go with Vegan Dad's recipe (Thanks Vegan Dad!), which I highly recommend. It's simple and makes a very easy-to-work-with dough. To make the green dough, I added about 12 (smallish-sized) collard greens to the regular recipe...all tolled, it was about 2 cups worth of finely chopped raw collards added to the basic recipe.


We don't have a pasta machine, but I find that provided you let the dough rest first, rolling it out by hand is just as easy.  Even if you do have a pasta machine, resting the dough is a good idea. To do this, roll the dough up into a ball, wrap it in some cellophane so it won't dry out and let it sit for 30 minutes or so. The dough becomes more relaxed and easy to work with after resting...isn't that true for us all? :)

Another important consideration is the workspace where you will you roll out the dough.  Make sure you give yourself ample room, and ideally the surface should be nice and cool...(i.e., it might not be the easiest thing to do in the midst of a heat wave). I use a granite slab pastry board that is ideal for working with doughs; it stays cool, and when lightly dusted with flour, nary a dough will stick.

In order to achieve sturdy ravioli that won't break open when you cook them, work gently with the dough, keeping a light dusting of semolina flour on your work surface and a tad bit on top of the dough and your rolling pin...you'll probably have to keep dusting it with more flour as you go. The important things are to get a uniform thickness in the dough and ensuring there are no tears or wholes in it.

Once rolled out to ~ 1/16 inch ( ~ 1.5 mm) thickness,  it may not look like a tidy bit dough to cut ravioli from, but that's easily fixed by trimming the dough to form a rectangle.


At this point, it's just a matter of dolloping the filling on in rows, placing the other half of the dough over it, and cutting out little squares.

You can make a sort of pastry "glue" by mixing some flour and water together (say 1 tablespoon flour and 2 tablespoons water) and brushing it around the dough where the edges of the ravioli will be. This will help the dough stick together.

After the squares are cut, gently reinforce the seal by pressing around the perimeter with your fingers. If you use a ravioli cutter, you get those nice little scalloped edges. (Alternately, you could make a half-moon variety of filled pasta, like the ones in this post.)


In the picture above, you can see where some flour/water "glue" is brushed around the filling.

Speaking of the filling,  I used a recipe for cashew cheese from The Conscious Cook cookbook. This recipe needs to be made in advance (you need to soak the cashews for several hours, and then another 14-16 hours for the probiotic cultures to form). Having ravioli on the brain this weekend, I started the cheese process yesterday morning. (Of course, you don't have to fill ravioli with cashew cheese, or vegan cheese of any kind for that matter...the options are limitless and up to your own taste, mood, and creativity.)

The basic method for making the cashew cheese is quite common and easily found online so I think it's safe to divulge. For instance, you can find the full recipe for the cashew cheese and what Mr. Ronnen makes with it here.

Basic cashew cheese method from The Conscious Cook, by Tal Ronnen:

Soak 2 cups raw cashews in water for 12 -14 hours. After the cashews have soaked, dissolve 1 tsp probiotic powder in 1 cup warm water, rinse the cashews and blend them in a food processor with the dissolved probiotics. Now, transfer to a clean bowl, cover and let it sit in a warm place for another 14-16 hours.

After it has set for the required amount of time...you can add in any extra ingredients you like for the filling. I didn't follow the rest of the recipe from the book, but rather added the following:

(not Tal's additions):

1/4 cup nutritional yeast
the zest and juice of 1 organic lemon
1/2 cup of finely chopped chives
1 cup diced zucchini
1 tsp sea salt (or to taste)

 lemon-chive cashew cheese with zucchini

The filling has a light lemon flavor and the zucchini pieces add a nice toothsome dimension.

Here's a shot of the top and bottom of the colored ravioli:

left=top  / right=bottom

If you wanted to get creative, you could probably come up with more artistic ways to combine the two doughs. For example, you could try overlapping strips of each dough slightly and rolling them out side by side to form one large stripey piece of dough...that would be fun. But I'll leave that for another day. I stuck with using one color of dough for the top and the other for the bottom, switching halfway through so some ravioli have green tops/yellow bottoms and some have yellow tops/green bottoms.

Here are the resulting ravioli. They're not picture perfect, but I'm pretty sure they'll hold together, and I sure hope they taste good:

ravioli colorati w/ collards and lemon-chive cashew filling


Once you have the ravioli made you can store them in the fridge for about 5-6 days, or freeze them. Freezing them is a good strategy because, in my experience, they tend to cook up better and without any breakage from a frozen state.

In order to avoid any breakages or filling mishaps, add them into gently boiling water and keep the heat such that they don't go into a rapid, rolling boil. Unlike regular unfilled pasta, ravioli don't fair too well at a rapid boil. You'll have to judge as you go how long to cook them...it will depend on the thickness of the dough and the shape/size of ravioli...but generally speaking, they are cooked when they rise to the surface...usually in about 6-8 minutes.


Ciao for now...have fun, make some ravioli!


Roseann LaPonte
Rosanne Tobin

Thursday, July 15, 2010

Walnut Tacos!


raw walnut tacos

I put an exclamation mark in the title of this post because these tacos were absolutely delicious...and I'm not exaggerating either. In the photo, they don't look especially extraordinary, but these tacos had a major yum factor going on, which was largely due to the raw walnut filling. (I took the photos about 20 minutes before dinner; so rest assured that we loaded on plenty more salsa and hot sauce right before eating them.)

I used this recipe as the basis for the filling with a few additions and substitutions. Instead of the plain olive oil, I used some vegan basil pesto. I also added some nacho jalapeno slices, some cumin, a splash of soy sauce, and some nutritional yeast for good measure. If you make the recipe, I suggest using it as a base and customizing it to your tastes by adding in your own little tweaks and perks. But whatever you do, don't exclude the sun dried tomatoes...they give this filling a lot of flavor.

raw walnut taco filling

There was tomato rice too--it's not in the photo because it was still cooking when I shot the tacos. If you've never had it, tomato rice is delicious: you basically saute onions with herbs/spices of your choice (I added chili powder, cumin, oregano) until the onion becomes translucent, then add the rice stir it through, then pour in an herby tomato broth, bring to simmer, cover and cook the rice through.

Now, on to the beer. Barnivore says this beer is vegan-friendly, so we couldn't resist trying some:

vegan-friendly watermelon-infused beer

It's fermented with watermelon juice; and it does have a subtle watermelon overtone...perfect with tacos on a summer evening, in my humble opinion.

Here's dessert:

local organic fruit, YUM!

Oh, and before I forget, has anybody tried these?

radish seed pods

They're some radish pods. I had never seen them before picking them up at the farmers' market last week. They're sweet and crunchy. The farmer said they're good in stir frys...I've been using them in salads.  Of course in order to get these, you can't eat the radishes--can't have your radishes and your pods too ya know :) 

Ciao for now.

Roseann LaPonte
Rosanne Tobin

Monday, July 5, 2010

Fava Bean Risotto w/ Garlic Scape-Mint Pesto


This past weekend afforded us our first fava harvest: the first of the season, as well as  the first ever.  I've never grown favas before, and I have to say it's been fun.  I set the seed back in February, and they are coming into their own now. These guys are planted in a side bed that only gets part sun with native clay soil to boot, and they still came through--lovely easy-going favas.

Risotto was the first thing that came to mind while picking the beans, and as garlic scapes abound at the moment, fava risotto with scape pesto seemed only natural.


Fava Risotto with Garlic-Mint Pesto

Makes 2 generous portions, double for 4-6 average servings

3/4 cup arborio rice
2 cups warm veggie broth
1/2 cup white wine
2/3 cup finely chopped onion/shallot/leek (your choice...I used a combo of onion and shallot)
2 tablespoons garlic scape pesto (jump to pesto recipe)
2 cups shelled and skinned fava beans
olive oil for saute-ing (or whatever you prefer to saute with)
salt and pepper to taste

First, blanche and de-skin the favas:

After shelling the individual beans, bring a pot of water to the boil. Meanwhile, have a large bowl of cold water floating with a tray or two of ice cubes standing by. Drop the shelled favas into the boiling water and blanche for ~ 1 minute. Drain the favas of hot water, rinse briefly in cold tap water and dump them into the bowl of cold water and ice to refresh the beans. When the beans are completely cool, drain off the cold water and de-skin them...it should be as easy as applying pressure to one end of the bean so it pops out of the thick outer skin. Set the favas aside.

In a large pot, over medium heat,  add some olive oil and saute the onion/shallots until translucent. Add the arborio rice and give it a good stir through. Add the white wine and stir the rice as it comes to a simmer. As the liquid cooks off, add the warm veggie broth 1/2 cup at a time, stirring frequently until the rice has become plump and tender.

Just before serving, stir in 2 tablespoons of the garlic-mint pesto and the blanched favas. Serve with pea shoots or other garnish of choice. (Salt and pepper to taste.)


Garlic Scape-Mint Pesto

This scape pesto is very basic, so you should use any type of pesto that you like to substitute if this doesn't float your boat:

12 large garlic scapes
10 - 12  mint leaves ( or more/less to taste) I used a combo of spearmint and pineapple mint
1 tablespoon nutritional yeast
1/2 teaspoon sea salt
water/oil to blend

Mix all ingredients in a food processor...I added about 1/8 cup water to get it started, then drizzled in some olive oil. Unctuous pestos are dreamy...but keep in mind you can add more oil later...I like to make the original a bit lean and add more oil in to taste for each recipe I make with it.

large  scapes  and mint 
(I didn't use all that mint for the recipe...only about 10-12 individual leaves)

favas on the stem

Roseann LaPonte
Rosanne Tobin

Thursday, July 1, 2010

White Bean & Potato Broth w/ Mixed Greens, Thyme, and Lemon


One-bowl meals are popular at our place…to be precise, they are my significant other’s favorite type of meal.  And, while I tend to prefer plated meals that consist of several distinct foods, I think he’s on to something there.  Soups, stews, curries…anything that lends itself to combining veggies, legumes, and other goodies into one pot usually makes a quick and satisfying meal…not mention easy cleanup.

I picked up some beautiful braising greens recently, and with the addition of some yellow potatoes, cannellini beans and a few other elements, this made a simple one-bowl meal. It's very basic and nothing special I know, but it turned out  tasty and rustic-looking so I thought I might as well post it.


I think the key to making this nice and savory is to let the broth simmer for a while before adding in the main vegetables.  If I don't have any homemade broth stored in the freezer, I like to use Seitenbacher Veggie Broth;  it contains a really nice combination of  nutritional yeast, dried veggies, and herbs including turmeric root, lovage, nutmeg and paprika, among others. In it's simplicity, it makes a really tasty broth and/or seasoning.

Serves 4
Broth:
1 large leek, sliced into thin rounds (2 cups sliced)
3-4 cloves garlic, slightly crushed but left whole
2 ribs of celery, chopped
8 cups water (I went with 4 cups veggie broth and 4 cups plain water)
pinch of red chili flakes
smattering of dried oregano
olive oil for sauteeing (or whatever you prefer to saute with) 

Veggies:
10 -12 medium-sized yellow potatoes, cut into quarters
large bunch of mixed greens/greens of choice (~ 1 pound's worth)
2 cups pre-cooked cannellini beans
lemon wedges
fresh thyme

Saute the leek, garlic, and celery until they become tender and aromatic...(I added a pinch of red chili pepper and some oregano too). Add the veggie broth/water and allow to simmer gently until the leek, garlic, and celery have infused nicely into the broth...this could be anywhere from 30 minutes to an hour. Then add the potatoes and continue to simmer until the potatoes are tender. Depending on the volume of your potatoes and how much the broth has cooked down...you may have to adjust the amount of  water. A few minutes before serving, add the greens and the beans. Serve with fresh lemon and thyme.

Along with a salad freshly picked from the garden it makes a pleasant seasonal meal.


But wait...there's more! I was delighted when I saw some organic blackcap raspberries at the local co-op. I was thinking of giving them a post all their own...but I didn't do anything special with them...we just ate them plain. And, that's all you need to do. They are my favorite summer berry: a tart edge over a deep raspberry flavor...truly delicious and perfect just the way they are.

 
Related Posts Plugin for WordPress, Blogger...